Records
Introduction
Records are the foundation of your workflow management system. This guide will help you efficiently manage large volumes of records through three powerful features: importing data from spreadsheets, creating custom input forms, and making bulk changes across multiple records.
Whether you're migrating existing data, setting up streamlined data entry processes, or maintaining consistency across your workflows, these tools will save you time and reduce manual effort.
You will learn
- Import Excel - Bulk insert records into workflows by uploading and mapping data from MS Excel spreadsheets
- Input Template - Create and manage customized HTML intake forms with auto-generated field tags for data entry
- Bulk Edits - Quickly update dropdown values, email addresses, and tickler email addresses across single or multiple records in a workflow
Import Excel
The Import Excel menu allows you to bulk insert records into a workflow by importing them from an MS Excel spreadsheet.
Use Case: Migrating Legacy Contracts
Common Pain Point: Your organization has hundreds of existing contracts stored in spreadsheets or legacy systems. Manually entering each contract into your new workflow system would take weeks and increases the risk of data entry errors.
Solution: Use Import Excel to bulk upload all your existing contracts at once. Simply prepare your Excel file with columns matching your workflow fields (Contract Number, Vendor Name, Start Date, End Date, Contract Value, etc.), and import all records in minutes instead of manually creating them one by one. This is especially valuable during system implementation, annual contract renewals, or when consolidating contracts from multiple departments.
How to Import Records Using Excel
-
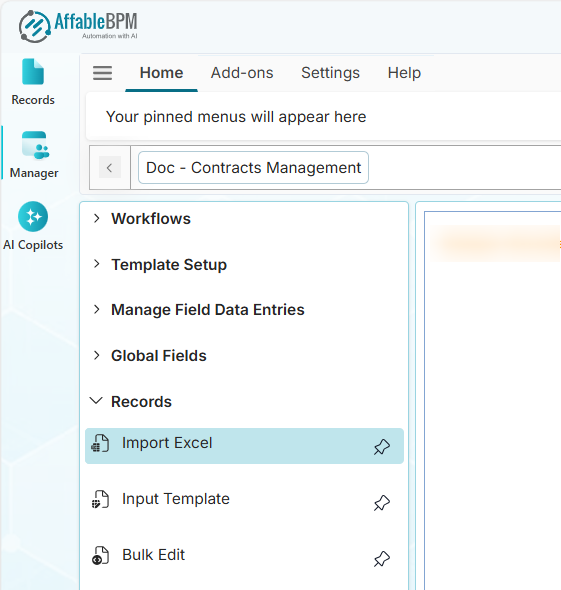
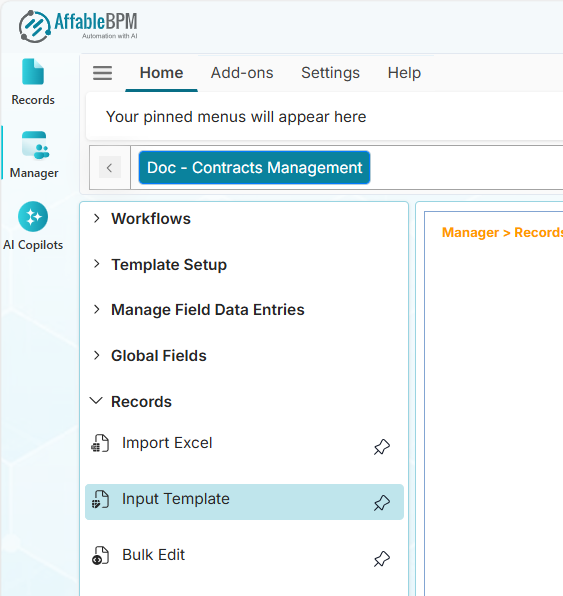
From the Manager sidebar tab, click Records.
-
Click the Import Excel menu.
-
Expand the Workflows menu and click your assigned workflow. The Import Excel page will display the default file type to import (Excel).
-
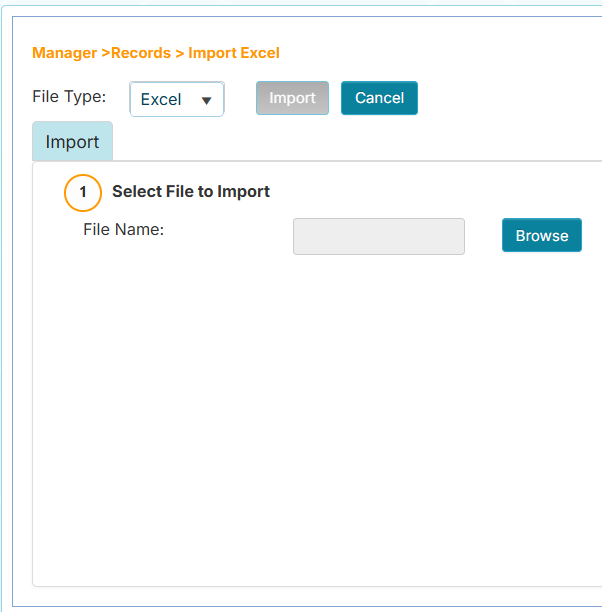
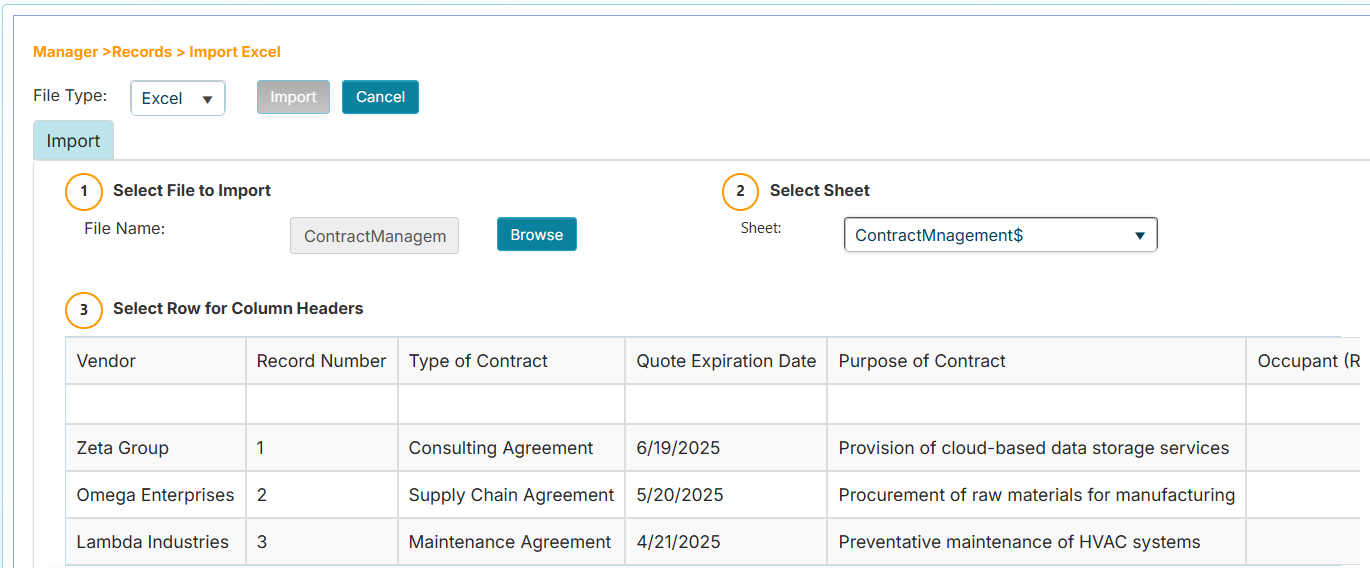
In Step 1, click the Browse button to locate and upload your MS Excel spreadsheet.
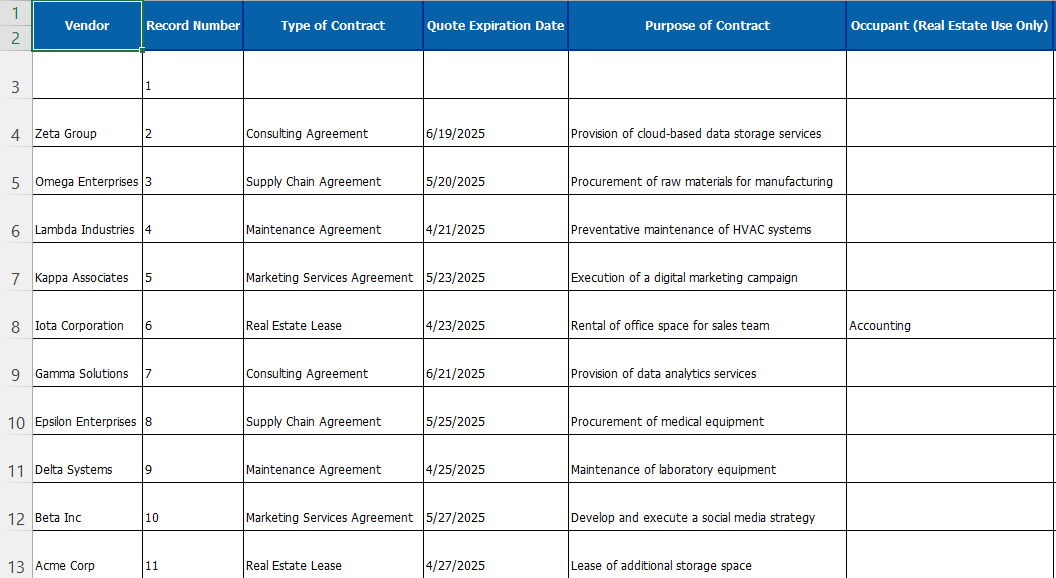
importantIt is advisable to format the Excel columns to match the field types as listed in Define Fields. See sample Excel spreadsheet below.
-
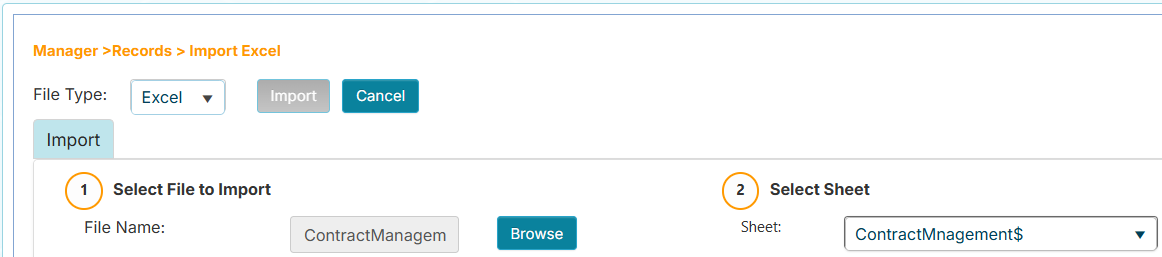
In Step 2, choose the sheet where the rows of records will come from in the Select Sheet dropdown.
-
In Step 3, click the row for column headers that will be used to match the names of the workflow fields. Step 4 will display the matching columns and fields.
 info
infoSome columns cannot be imported because they are system-generated or not supported for import.
System-generated fields:
- Auto Number
- Create DateTime
- Create User
- Update DateTime
- Update User
Fields that cannot be imported:
- Repeat (Recurring Entries)
- Selection Box
- Selection Box/Back
The screenshot below shows the column Record Number (System Generated) which cannot be imported. System-generated fields like Auto Number will generate new values for each new imported record.

-
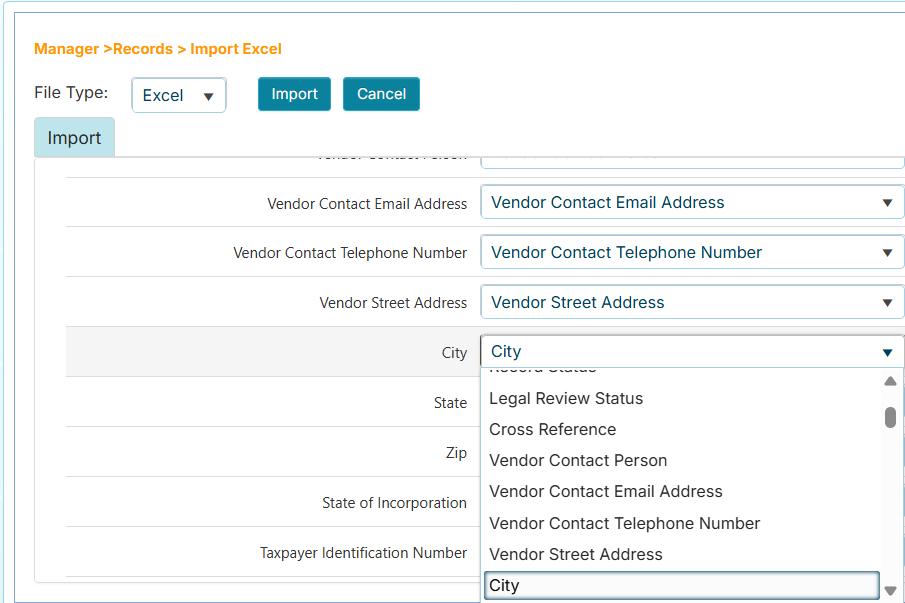
In Step 4, you can also manually match the columns to the field names by choosing from the dropdown list.
 important
Ensure that all required columns (designated with an asterisk *) have a match in the column headers of the spreadsheet.
-
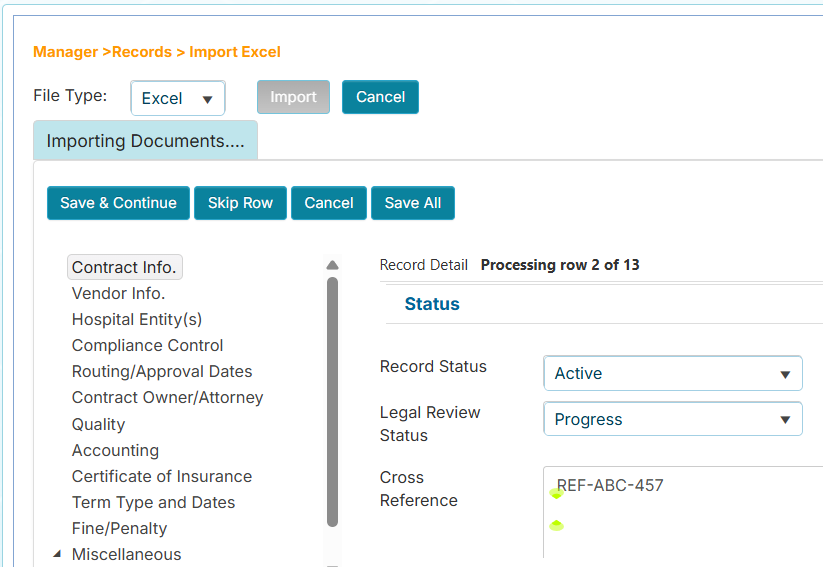
Click the Import button to prepare for importing the spreadsheet. The page will display the tab names and fields of the workflow on the left side and the values assigned to each field on the right side. The page will also display the total number of records to be imported.
-
(Optional) If the workflow has tab fields, inspect each tab by clicking on them and checking the right side for the assigned values.
You can use the following options to import the record:
- Save & Continue - Process the current row and import its values to create a new record in the workflow repository
- Skip Row - Skip the row and go to the next row
- Cancel - Cancel the import
- Save All - Process each row for import. If errors are found, the process will stop and display a message to help you resolve the issue
infoIf there are dropdown fields in the workflow and the system detects new values from the Excel file, the field name will be displayed in a message window. You will need to find the field and (optionally) click the value next to it to have the value added to the workflow.
Input Template
The Input Template allows you to create customized intake forms (input forms) to submit a new record into the workflow repository. The input form is an HTML file with field tags that are used to assign new values to the new record.
Use Case: Streamlining Vendor Onboarding
Common Pain Point: Your procurement team receives vendor contract requests via email, phone calls, or paper forms. Requesters don't know what information is needed, leading to incomplete submissions and multiple back-and-forth communications. The procurement team wastes hours chasing down missing details like insurance certificates, W-9 forms, or authorized signatories.
Solution: Create a custom Input Template that can be shared as a web link with anyone who needs to submit a new vendor contract request. The form ensures all required fields (Vendor Name, Contact Information, Service Description, Budget Code, Insurance Requirements) are completed before submission. You can email the link to department heads, post it on your intranet, or include it in your procurement guidelines. This standardizes data collection, reduces incomplete submissions by 80%, and allows non-technical users to submit properly formatted requests without needing system access.
How to Add an Input Template
-
From the Manager sidebar tab, click Records.
-
Click the Input Template menu.
-
Expand the Workflows menu and click your assigned workflow.
-
On the Input Template page, click the Add button. On the right side, the page will display the list of field tags that you can copy and paste into an HTML file.
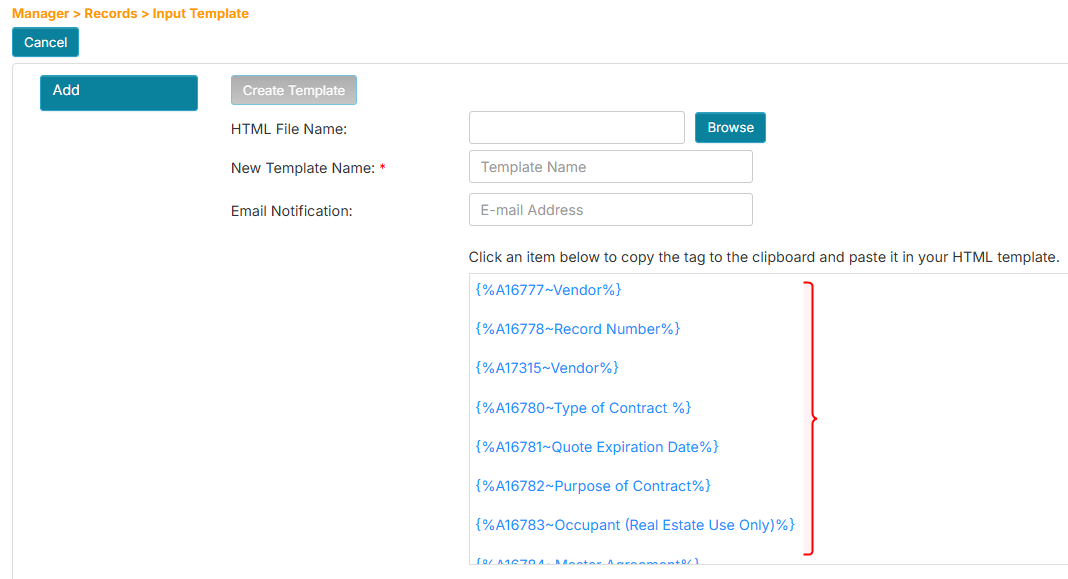 info
info- The tags are auto-generated combinations of a code number and a field name (e.g.,
{%A156~Contract Number%}). - The code number is the important part that will be used to match the input values to the assigned fields.
- Each workflow will generate its own unique field tag combinations.
- The tags are auto-generated combinations of a code number and a field name (e.g.,
-
Open your text editor and copy and paste the following HTML sample. The sample will accept basic Vendor information to create a new record.
The HTML sample contains code for formatting the layout of the template. It contains HTML tags:
<table>,<tr>,<td>that are used to place the field labels and codes. You can learn more about these tags in HTML <table> Tag ↗.<!DOCTYPE html>
<html lang="en">
<head>
<meta charset="UTF-8">
<meta name="viewport" content="width=device-width, initial-scale=1.0">
<title>New Vendor Intake Form Sample</title>
<!-- Insert your custom CSS styles.-->
<style type="text/css">
body {
font: 14px/20px Georgia, "Times New Roman", Times, serif;
}
h1 {
font-weight: 200;
}
table {
border-collapse: collapse;
margin-top: 40px;
}
table td {
padding: 4px 10px;
border: 1px solid #ddd;
color: #333;
}
div#content {
margin: 30px 20px;
}
</style>
</head>
<body>
<h1>New Vendor Submission</h1>
<form>
<table>
<tr>
<td><!-- Replace with field name --></td>
<td><!-- Replace with field tag --></td>
</tr>
<tr>
<td><!-- Replace with field name --></td>
<td> <!-- Replace with field tag --></td>
</tr>
<tr>
<td><!-- Replace with field name --></td>
<td><!-- Replace with field tag --></td>
</tr>
<tr>
<td><!-- Replace with field name --></td>
<td><!-- Replace with field tag --></td>
</tr>
<tr>
<td><!-- Replace with field name --></td>
<td><!-- Replace with field tag --></td>
</tr>
</table>
</form>
{%SubmitButton~Submit%}
</body>
</html>In this example, we will use the following fields:
- Vendor
- Type of Contract
- Purpose of Contract
- Vendor Contact Person
- Vendor Contact Email Address
-
Replace the placeholders with your chosen field names and tags. Below is the sample HTML with the applied field names and tags.
<!DOCTYPE html>
<html lang="en">
<head>
    <meta charset="UTF-8">
    <meta name="viewport" content="width=device-width, initial-scale=1.0">
    <title>New Vendor Intake Form Sample</title>
    <!-- Insert your custom CSS styles.-->
    <style type="text/css">
        body {
            font: 14px/20px Georgia, "Times New Roman", Times, serif;
        }

        h1 {
            font-weight: 200;
        }

        table {
            border-collapse: collapse;
            margin-top: 40px;
        }

        table td {
            padding: 4px 10px;
            border: 1px solid #ddd;
            color: #333;
        }

        div#content {
            margin: 30px 20px;
        }
    </style>
</head>
<body>
    <h1>New Vendor Submission</h1>
    <form>
        <table>
            <tr>
                <td>Vendor:</td>
                <td>{%A16777~Vendor%}</td>
            </tr>
            <tr>
                <td>Type of Contract:</td>
                <td>{%A16780~Type of Contract%}</td>
            </tr>
            <tr>
                <td>Purpose of Contract:</td>
                <td>{%A16782~Purpose of Contract%}</td>
            </tr>
            <tr>
                <td>Vendor Contact Person:</td>
                <td>{%A16799~Vendor Contact Person%}</td>
            </tr>
            <tr>
                <td>Vendor Contact Email Address:</td>
                <td>{%A16800~Vendor Contact Email Address%}</td>
            </tr>
        </table>
    </form>
    {%SubmitButton~Submit%}
</body>
</html> -
Save the HTML file.
tipEnsure the HTML file has an .htm or .html extension when saving. This helps our app recognize the file as a valid intake form and ensures smooth upload and processing.
-
Back in the Input Template page, click the Browse button.
-
Locate and upload your HTML file. The HTML Template Name box will be populated with your HTML filename.
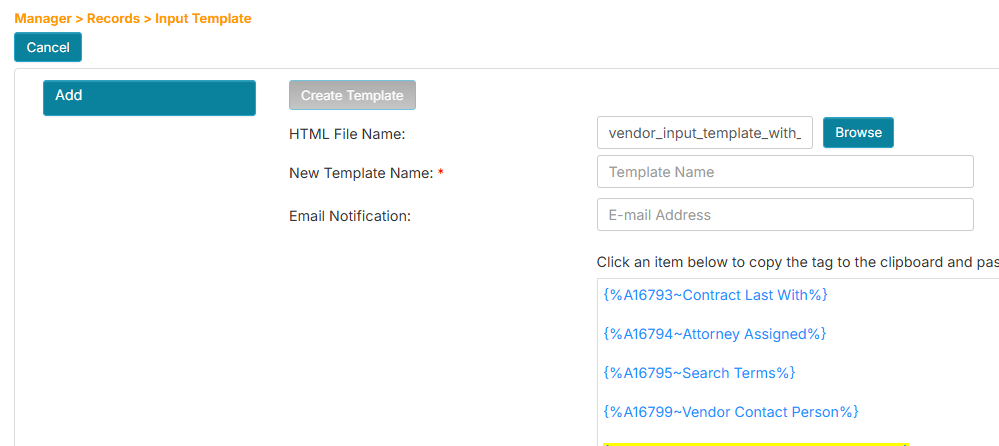
-
In the Input Template Name box, enter a descriptive title.
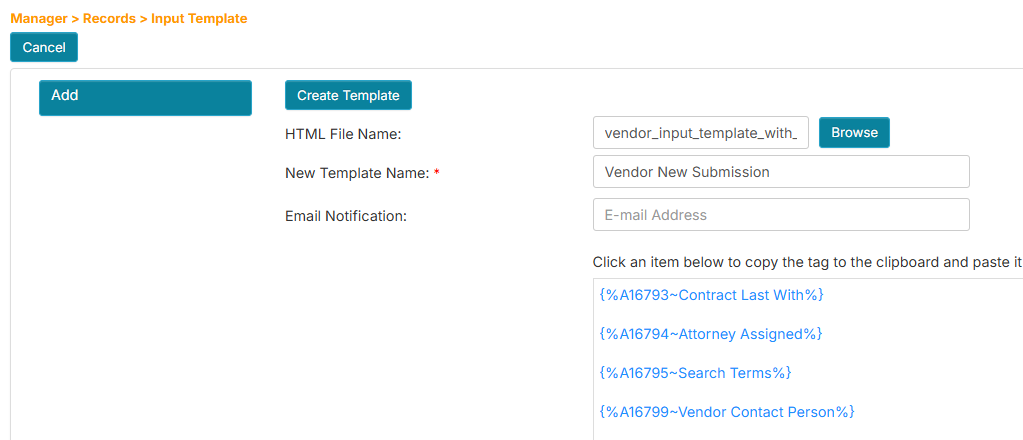
-
(Optional) In the Email Notification box, enter the email address of the person who will receive notification when the input form is submitted.
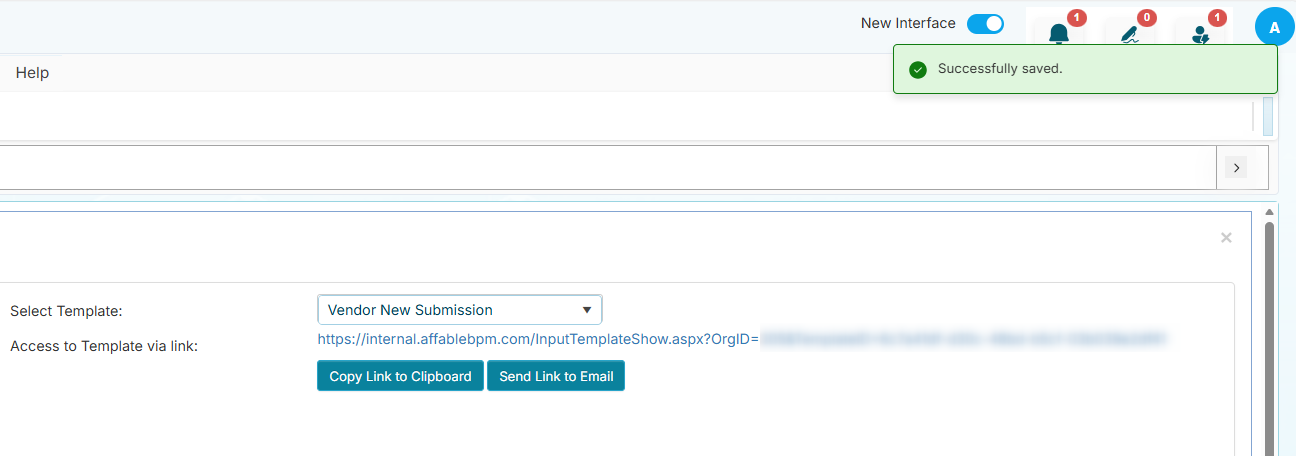
-
Click the Create Template button to add the new template. The HTML file will be validated and the application will generate a new URL. You can use the Copy Link to Clipboard and Send Link to Email buttons to share the URL for input form submission.
Input Template Options
Use the following options to manage the Input Templates:
-
Add - Upload a new template
-
Replace - Replace an existing template
-
Preview - Display the input template in a new browser tab with a sample record
-
Extract - Download the HTML file of the template
importantEnsure that the pop-up blocker is disabled for the AffableBPM System. If you are using Internet Explorer, right-click on the prompt message and select "Download File" to continue downloading the template. Once the File Download dialog appears, click Open or Save.
-
Remove - Delete the selected template
dangerDeleting an input template is permanent. Ensure that it is no longer needed and the removal is properly communicated to your team.
Bulk Edits
The Bulk Edits feature allows you to quickly change the values of dropdown fields and email addresses in a workflow without needing to open each record in a form view.
Use Case: Organizational Changes and Mass Updates
Common Pain Point: Your contracts manager, Sarah Johnson (sjohnson@company.com), is leaving the company and being replaced by Michael Chen (mchen@company.com). She is responsible for 150 active contracts. Manually opening each contract record to update the Contract Manager field and notification emails would take hours and risks missing critical contracts. Similarly, your company recently restructured departments, changing "IT Services" to "Technology Services" across all contracts, or a vendor changed their legal entity name from "ABC Corp" to "ABC Corporation" affecting dozens of contracts.
Solution: Use Bulk Edits to update all 150 contracts in under 5 minutes. Simply search for "sjohnson@company.com" in the Contract Manager field, select "All Records," and replace it with "mchen@company.com" in one action. The same applies to dropdown values—search for "IT Services," select all occurrences, and update them to "Technology Services" across your entire contract portfolio. This ensures consistency, eliminates human error from repetitive manual updates, and provides an audit trail showing exactly when and who made the changes.
How to Bulk Edit Dropdown Values
-
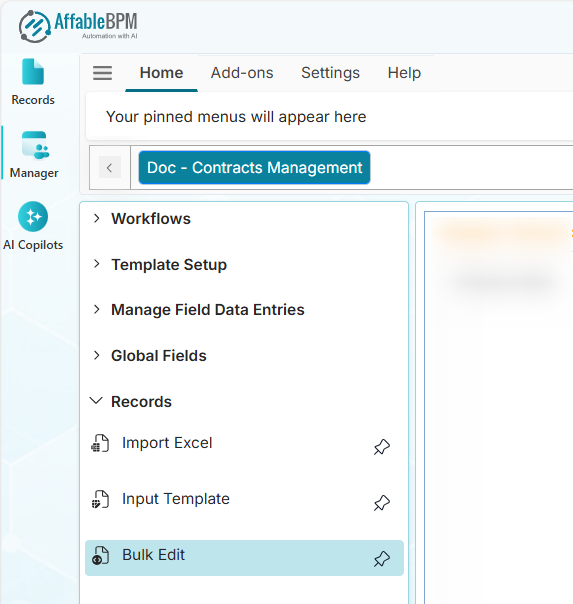
From the Manager sidebar tab, click Records.
-
Click the Bulk Edits menu.
-
Expand the Workflows menu and click your assigned workflow.
-
In the Choose a field dropdown, choose the dropdown field. See example below.
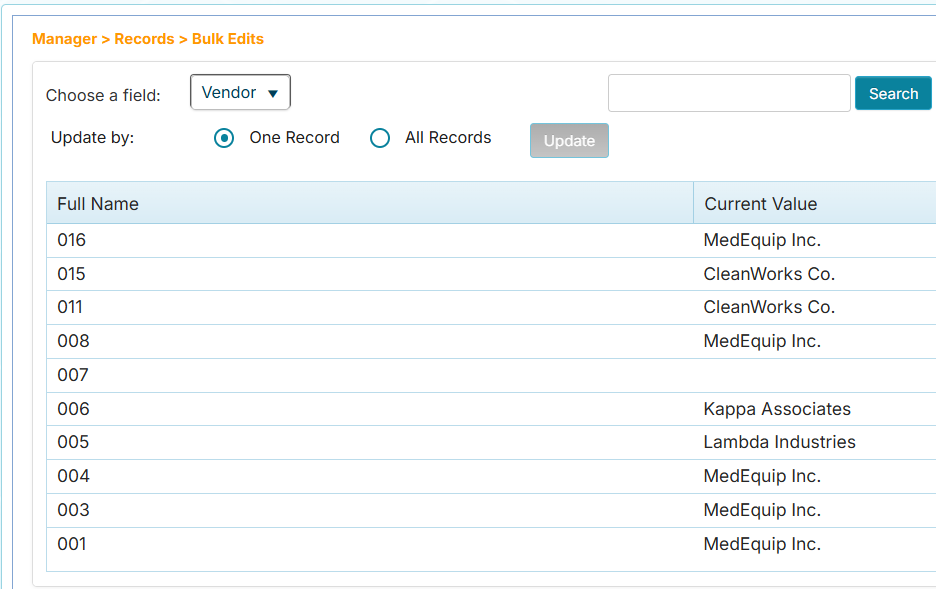 tip
tipYou can get the list of fields and their field types from the Define Headers page.
-
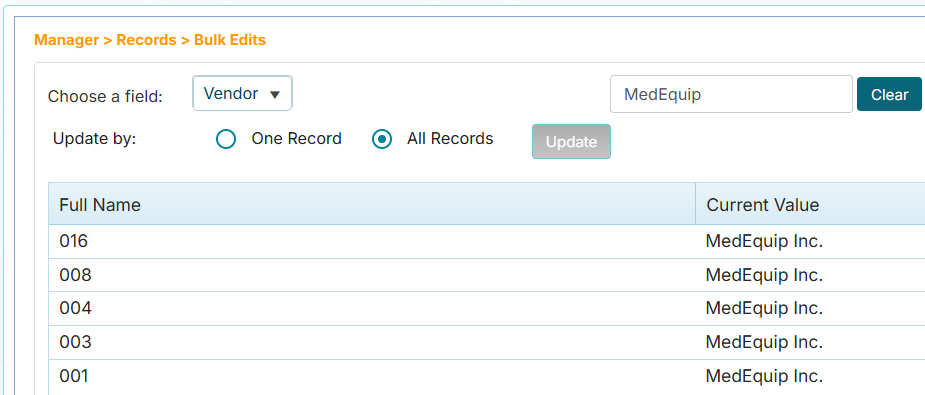
In the Search box, enter the search term to be replaced, then click the Search button. See example below.
-
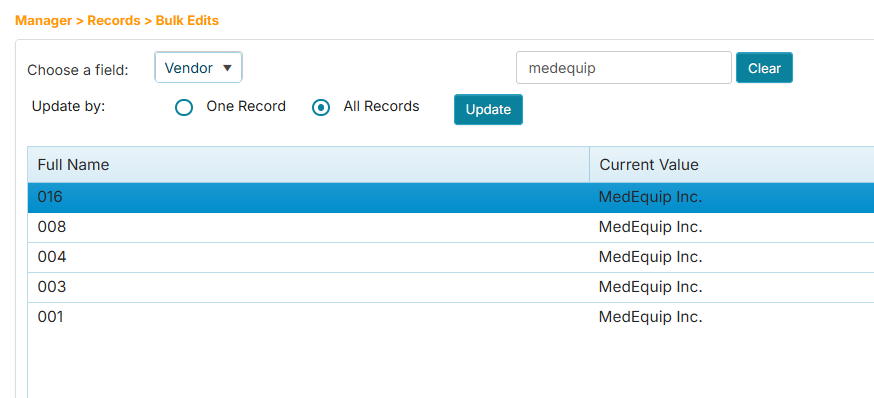
Click the row that you wish to change. The Update button will be enabled. You have the option to update one record or all records in one go.
-
Click the All Records option if you wish to update all occurrences.
-
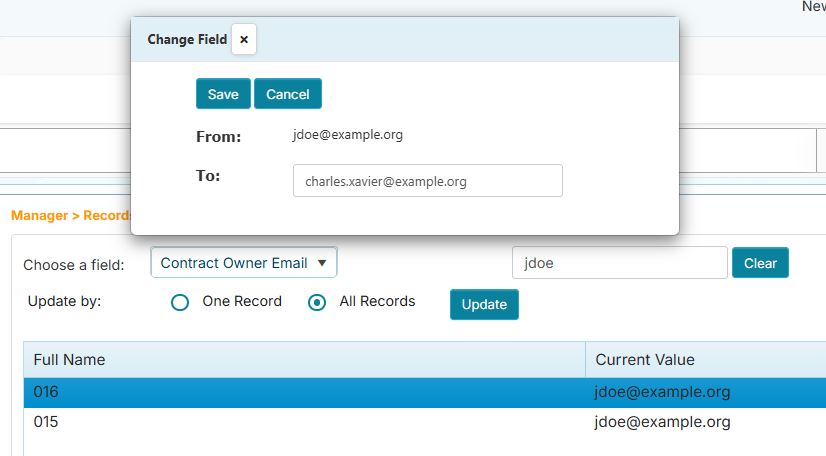
Click the Update button. A window will appear to help you change the selected value to another.
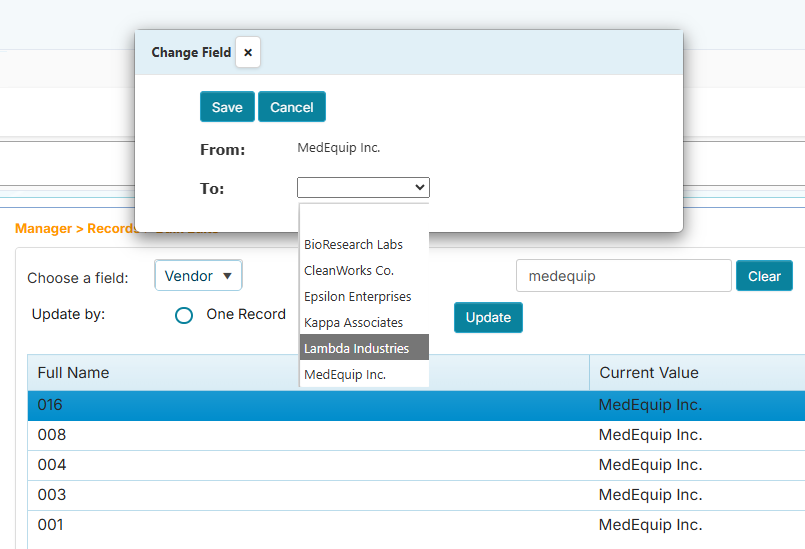 tip
tip- If the All Records option is selected, the Update button will be enabled only if there is an existing value to be changed. It does not work for blank values.
- All Bulk Edit actions are recorded in the Audit Log of each record to identify who made the change.
-
Click the Save button to confirm, or Cancel to abort.
How to Bulk Edit Email Addresses
-
From the Manager sidebar tab, click Records.
-
Click the Bulk Edits menu.
-
Expand the Workflows menu and click your assigned workflow.
-
In the Choose a field dropdown, choose the email field. See example below.
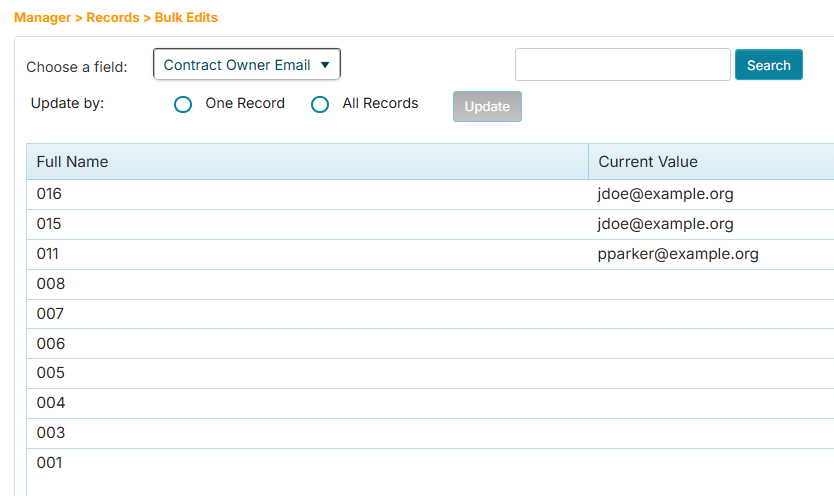 tip
tipYou can get the list of fields and their field types from the Define Headers page.
-
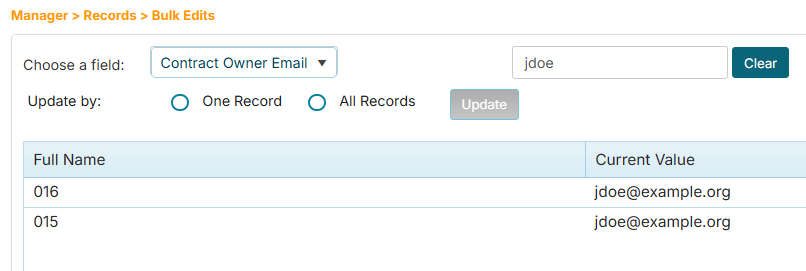
In the Search box, enter the email address to be replaced, then click the Search button. See example below.
-
Click the row that you wish to change.
-
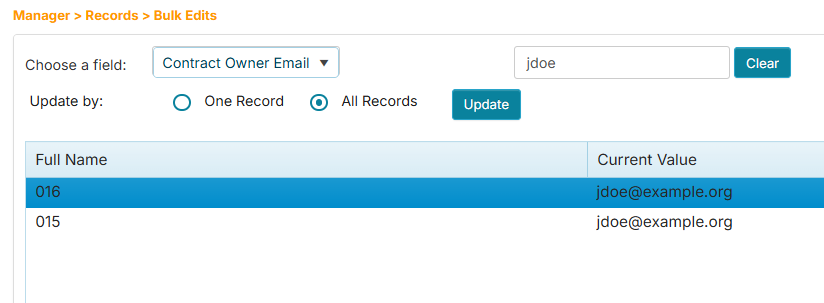
Click the option to update one record or all records in one go. The Update button will be enabled.
-
Click the Update button. A window will appear to help you change the selected value to another.
 tip
tip- If the All Records option is selected, the Update button will be enabled only if there is an existing value to be changed. It does not work for blank values.
- All Bulk Edit actions are recorded in the Audit Log of each record to identify who made the change.
-
Click the Save button to confirm, or Cancel to abort.
How to Bulk Edit Tickler Email Addresses
-
From the Manager sidebar tab, click Records.
-
Click the Bulk Edits menu.
-
Expand the Workflows menu and click your assigned workflow.
-
In the Choose a field dropdown, choose the tickler field—they have the suffix (Notify Emails). See example below.
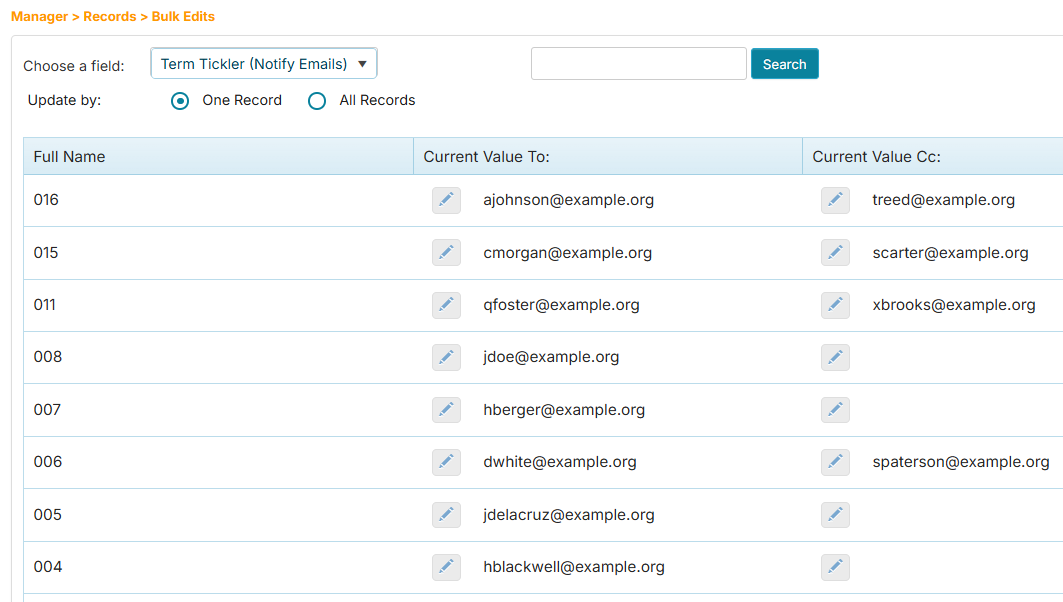 info
infoA workflow has a setting for Enable CC in Notification Fields. If this is enabled, the Bulk Edits page will display the columns: Current Value To: and Current Value CC:; otherwise, only the Current Value column will appear.
-
Click the row that you wish to change.
-
Click the option to update one record or all records in one go.
-
If the Enable CC in Notification Fields setting is enabled for the workflow, the Edit (pencil) button will appear to edit the To: and CC: fields; otherwise, the Update button will appear.
-
Click the Edit or Update button. A window will appear for entry of the new value.
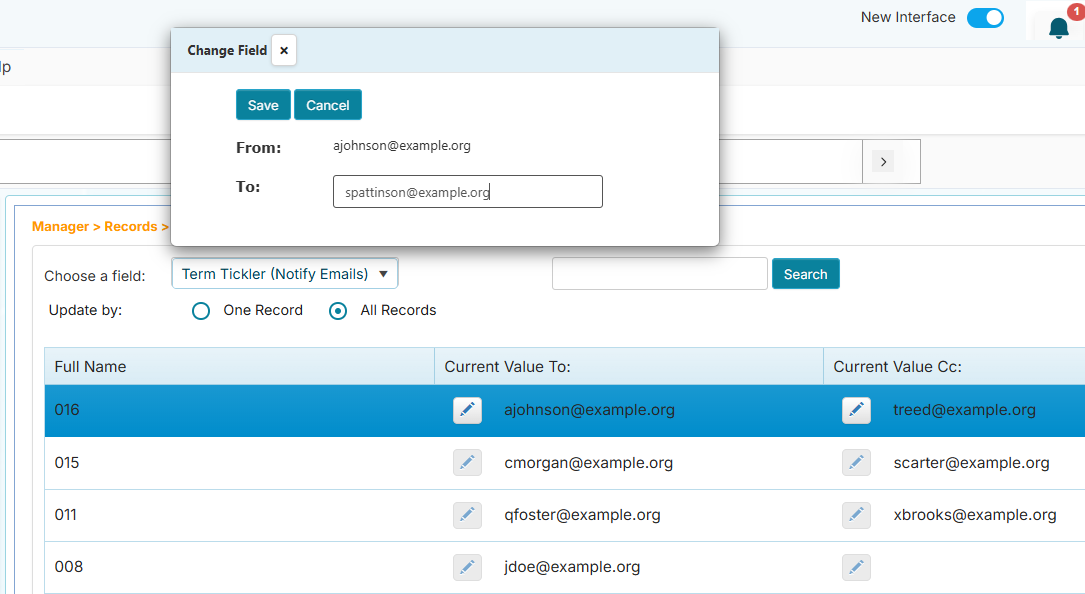
-
Enter the new value, then click the Save button.
tip- Choose the All Records option if you wish to update all occurrences of the value. The Edit or Update button is not enabled if a blank value is selected.
- All Bulk Edit actions are recorded in the Audit Log of each record to identify who made the change.